반응형


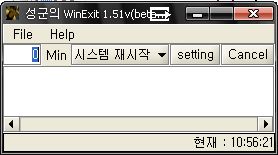
WinExit을 업그레이드 하였다.

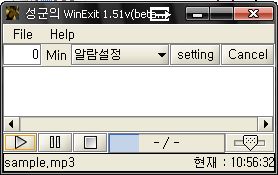
WinExit 1.51v
-알람파일 미리듣기 추가(mp3)
-알람파일설정가능
-셋업파일에 알람파일 경로와 볼륨 저장(alarm.ini)
--mp3 파일 재생을위한 방안 고려
--JMF 사용하였으나 해당 사용자가 JMF 설치를 해야 작동하므로
   관련 지식이 없는 사용자의 불편함 발생.. basicplayer 엔진사용
-- basicplayer 사용시 필요 라이브러리
이전포스트 : http://pmguda.com/496

GudaSong 개발계획(알람설정 미리듣기를 활용)
-객체지향 프로그램을 위해 분석 설계부터 차근차근 시작할예정
-마인드맵으로 기본 구조 설계
MP3 파일 재생기능이 추가된것이 가장 크게 변화된 점이다.

물론 이번에 추가된 MP3 재생 기능은 따로 GudaSong 을 개발 계획임

그외에 딱히 수정한 바는 없다. 약간의 소스 수정과 정리가 있긴 했지만 객체지향을 위해

여러 패키지로 나누고 분류하고 했지만 더 난잡해진것 같다.

처음부터 설계 없이 시작한 결과여서 그런것 같다. 므튼 개인적으로 만들면서 많이 배우는거 같다.

업데이트 계획이나 진행상황은 다음에 정리할 생각이다.
반응형
기존의 구현하였던 WinExit을 조금 업그레이드 하였습니다.
별다르게 크게 달라진것은 없습니다.

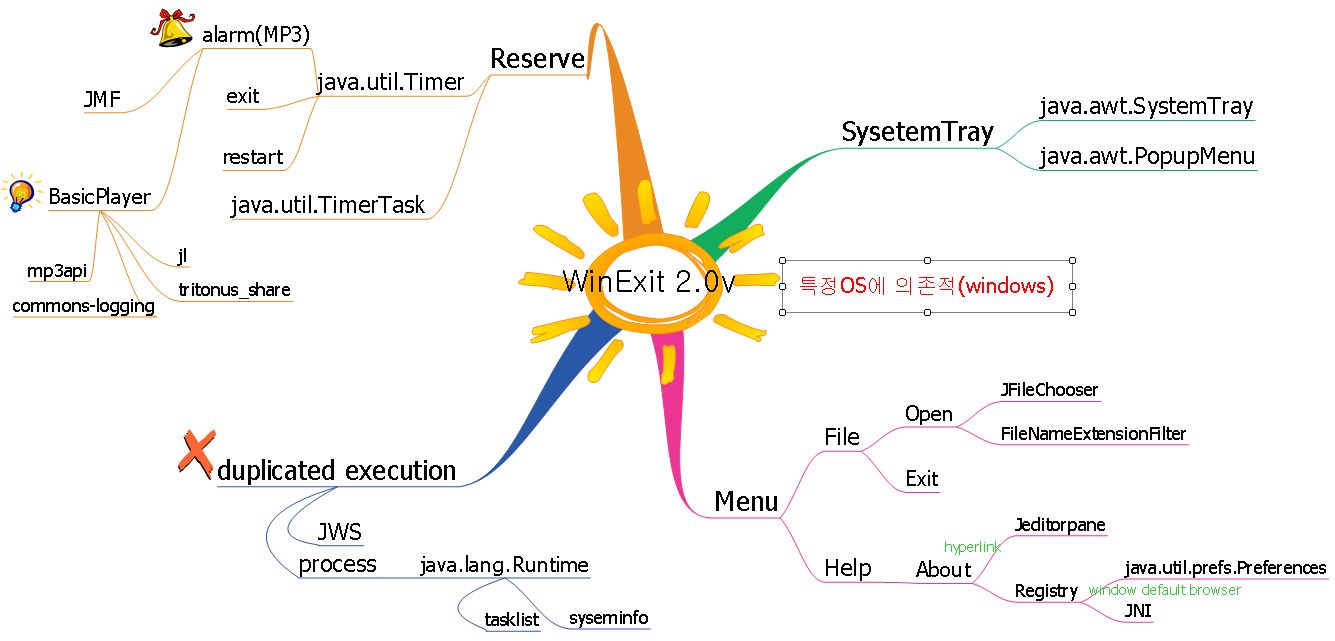
마인드 맵으로 한번 WinExit을 그려봤습니다.
시험삼아 마인드맵을 그려본건데 괜찮은것 같네요.  별 계획이 없어서인지 마인드맵도 영~
조금씩 배워가면서 추가해야겠네요 ^^


-  중복실행 방지
-  상태바에 종료시간 출력
-  즉시 종료,재실행시 확인 다이얼로그
-  메뉴바 추가(Help -> about)
- OS의 default browser 를 가져오기(레지스트리 조회: java.util.prefs.Preferences )

추가사항
- 예약종료시간(해당시간설정, 날짜설정, 등등..)
- 예약 종료 형식의 다양화 고려
- 알람기능 추가 (MP3 파일 설정 기능)
- JWS를 이용한 배포
- JNI를 이용한 레지스트리 조회(윈도우 레지)
- jar화일의 이미지 로딩
- JWS 형식배포 고려
-WinExit의 중복실행을 방지하기 위해
--현재 프로세스에서 실행 여부를 체크
-윈도우 특정 플랫폼 명령어 의존발생
--systeminfo,tasklist  명령어 의존
JNLP 적용해보기..


반응형
commons-logging-1.1.1.jar    //로그 출력
http://commons.apache.org/downloads/download_logging.cgi
mp3spi1.9.4.jar                    //MpegAudioSPI1.9.4  mp3 재생
http://www.javazoom.net/mp3spi/mp3spi.html
vorbisspi1.0.3.jar                 //OGG
http://www.javazoom.net/vorbisspi/vorbisspi.html
jl1.0.jar
http://www.javazoom.net/javalayer/javalayer.html
tritonus_share-0.3.6.jar
http://tritonus.org/
등의 라이브러리가 필요하다

관련자료와 링크는 이전 포스트에 있다
http://www.pmguda.com/448
반응형
FTP? 자바?

FTP는 요즘 같은 인터넷 세상에서 빠지지 않는 프로토콜이다. FTP가 무엇인지 잘 모른다면 다음을 참고하자.
FTP (File Transfer Protocol) ; 파일 전송 프로토콜

FTP[에프 티 피]는 인터넷상의 컴퓨터들간에 파일을 교환하기 위한 표준 프로토콜로서 가장 간단한 방법이기도 하다. 화면에 표시할 수 있는 웹 페이지와 관련 파일들을 전송하는 HTTP (Hypertext Transfer Protocol), 전자우편을 전송하는 SMTP (Simple Mail Transfer Protocol)등과 같이, FTP도 역시 인터넷의 TCP/IP 응용 프로토콜 중의 하나이다. FTP는 웹 페이지 파일들을 인터넷상에서 모든 사람이 볼 수 있도록 하기 위해 저작자의 컴퓨터로부터 서버로 옮기는 과정에서 사용된다. 또한, 다른 서버들로부터 자신의 컴퓨터로 프로그램이나 파일들을 다운로드 하는 데에도 많이 사용된다.

사용자 입장에서는 간단한 명령어를 통하여 FTP를 쓰거나, 또는 그래픽 사용자 인터페이스를 제공하는 상용 프로그램을 쓸 수도 있다. 보통은 웹 브라우저도 웹 페이지로부터 선택한 프로그램을 다운로드 하는데 FTP를 사용한다. FTP를 사용하여 서버에 있는 파일을 지우거나 이름을 바꾸거나 옮기거나 복사하는 등 갱신작업을 할 수도 있다. FTP 서버에는 로그온을 해야 하지만, 익명의 FTP를 사용하여 모든 사람들에게 공개된 파일들을 쉽게 접근할 수 있도록 하고 있다.

FTP는 보통 TCP/IP에 함께 딸려오는 일련의 프로그램 속에 포함되어 있다.
간단히 말해서 FTP는 파일 전송 프로토콜이다. 우리는 FTP라는 프로토콜을 알게 모르게 많이 사용하고 있다. 회사 동료들 사이에 문서를 주고 받거나, 친구들과 음악 파일, 동영상 등을 주고 받는데 항상 사용하고 있는 것이다. 일반 컴퓨터 사용자들은 프로토콜이니 그런 것에는 관심 없을 것이다. 내가 원하는 파일을 주고 받기만 하면 될 뿐이니까… 그래도 FTP를 사용하기 위해서는 기본 명령을 알아야 한다. 하지만 이런 기본 명령 조차도 귀찮을 다름이다.

FTP 클라이언트 프로그램을 사용하면 FTP 명령을 알지 못하는 사람들도 GUI 환경에서 쉽게 FTP 서버에 접속해서 원하는 파일들을 주고 받을 수 있다. 일반적으로 많이 사용되는 FTP 클라이언트 프로그램으로는 WS_FTP, CuteFTP, 알FTP 등이 있다. 그렇다면 과연 누가 이런 FTP 클라이언트 프로그램을 만드는가? 당연히 개발자의 몫이다. 그럼 또한 자바로는 가능한가. 당연히 자바로도 가능하다. 원래 자바라는 언어 자체가 네트워크 분야에서 강력한 힘을 발휘한다고 하지 않는가? 이제부터 우리는 자바로 FTP 클라이언트 프로그램을 개발해 볼 것이다. 물론 다른 상용 프로그램처럼 훌륭한 GUI를 지원하는 프로그램은 아니다. 콘솔에서 작동하는 “Hello FTP”를 개발할 것이다. “에이, GUI가 없다면 썰렁할텐데…” 물론 이렇게 생각하는 분들도 있을 것이다. 하지만 모든 프로그램은 항상 “Hello”로부터 시작되므로 무시해서는 안될 것이다. 화려한 GUI 개발은 여러분들이 직접 해보시길 바란다. 아마 쉽지 않은 작업이 분명할 듯…

무엇이 필요한가?

당연히 자바로 개발하기 위해서는 JDK가 있어야 한다. JDK를 구하고 설치하는 것은 다른 자바 기초 서적을 참고하기 바란다.

자바만으로도 FTP 관련 프로그램을 만들 수 는 있다. sun.net.ftp 패키지에 보면 FTP 클라이언트 구현을 위한 클래스들이 있다. 하지만 필자가 프로젝트를 하면서 이 패키지를 사용해 보았는데, 몇몇 기능이 원하는 기능을 지원하지 않는 것을 알게 되었다. 그리고 썬사의 문서를 참고하면 sun으로 시작되는 패키지는 사용하지 말라고 권하고 있다.

아… 그렇다면 어찌해야 한단 말인가?
FTP 프로토콜을 지원하는 모든 기능을 다 구현해야 한다는 말인가? 충분한 시간과 실력이 된다면 그것도 좋은 방법이다. 일단 실력은 둘째 치고라도 우리에게는 충분한 시간이 없다. 이럴 때 도움을 받을 수 있는 수 많은 오픈 소스들과 공짜 패키지 들이 있지 않은가? 비겁하고 치사하다고 생각할 필요는 없다고 생각하자. 어차피 우리는 생활에 필요한 대부분의 것을 남이 만든 것을 사다 쓰고 있는 현실이니…

http://www.savarese.org/java/index.html에 가면 NetComponents에 대한 설명이 있다. 자세한 것은 읽어보면 알겠지만 소스 코드까지 무료로 사용할 수 있다. 우리는 이것을 사용할 것이다. http://www.savarese.org/downloads/NetComponents/에서 다운로드 받으면 된다. 필자는 NetComponents-1.3.8-bin.zip 파일을 다운로드 받아서 압축을 풀었다. 여러 폴더와 파일들이 있다. 필자는 윈도우를 사용하고 있다. 혹시 다른 운영체제를 사용한다면 문서들을 살펴보길 바란다.

NetComponents.jar 파일을 클래스패스에 추가하자. 클래스패스에 추가하는 방법을 모르는 분들은 다른 자바 기초 서적을 참고하시길… Doc 폴더에는 API 도움말이 있고 examples 폴더에는 여러 예제가 있다. 눈치 빠른 개발자들이라면 예제 파일을 본 후에 NetComponents가 아주 많은 프로토콜을 지원한다는 것을 쉽게 예상 할 수 있을 것이다. 공짜로 사용하는 것 치고는 아주 많은 기능을 제공한다. 여유가 되는 분들은 다른 기능도 사용해보고 이에 대한 기사 올려준다면 다른 개발자들에게 큰 힘이 될 것이 분명하다. 물론 예제에는 FTP도 포함되어 있으며(ftp.java) 본 기사에서도 이 예제를 참고할 것이다.

어떤 기능을 개발할 것인가?

프로그램을 개발하기 위해서는 어떤 것을 개발할 것인지, 어떤 기능을 수행해야 하는지를 명확히 알아야 한다. 이런 것들을 소프트웨어 공학에서는 “요구 사항” 이라고 한다. 요구 사항이 명확히 정의 되지 않으면 개발 도중에 많은 실수를 반복하고 기간이 늘어나기 쉽상이지만 우리가 개발할 프로그램의 요구 사항은 아래와 같이 간단하다.
  • FTP 서버에 접속한다.
  • 정해진 디렉토리로 이동한다.
  • 디렉토리 내의 사이즈가 0보다 큰 모든 로그 파일들을 가져온다.
혹시 다른 기능이 더 필요하다면 API 도움말을 참고하면 된다. 적절한 클래스와 메소드들을 사용해서 상용 FTP 클라이언트 프로그램들이 제공하는 기능은 대부부분 구현이 가능하다.

소스코드

코드 자체는 그리 어려운 부분이 없으므로 따로 설명이 필요할 것이 없다. 기능 자체가 워낙 간단해서인가? 여러분들은 그저 중간에 간단히 적힌 주석 부분만 참고하면 될 것이다. 컴파일을 하고 실행을 하면 화면에서는 나타나는 것이 없지만 실제로 파일이 전송된다. 여러분도 적절히 수정을 하여 원하는 파일들을 서버로부터 전송 받을 수 있을 것이다.
import java.io.*;

import com.oroinc.net.ftp.*;
import com.oroinc.net.*;

public class MyFtpClient {
    static String server = "xxxxx";
    static int port = 21;
    static String id = "xxxxx";
    static String password = "xxxxx";
    FTPClient ftpClient;

    public MyFtpClient(String server, int port, String id, String password) {
        this.server = server;
        this.port = port;
        ftpClient = new FTPClient();
    }

    public static void main(String args[]) {
        MyFtpClient ftp = new MyFtpClient(server, port, id, password);
        ftp.connect();
        ftp.login(ftp.id, ftp.password);
        // 로그파일이 있는 디렉토리로 이동한다
        ftp.cd("/home/ems/emsprj/project/wos/WosLog/log");
        FTPFile[] files = ftp.list();
        for (int i = 0; i < files.length ; i++) {
            String fileName = files[i].getName();
            // 파일 이름에서 확장자만 추출
            String extension = fileName.substring(fileName.lastIndexOf(".") + 1);
            long size = files[i].getSize();
            // 파일 사이즈가 0보다 크고 로그 파일만 가져온다
            if ( (size > 0) && (extension.equalsIgnoreCase("log")) ) {
                File file = ftp.get(fileName, fileName);
            }
        }
        ftp.logout();
        ftp.disconnect();
        System.exit(1);
    }

    // 계정과 패스워드로 로그인
    public boolean login(String user, String password) {
        try {
            this.connect();
            return ftpClient.login(user, password);
        }
        catch (IOException ioe) {
            ioe.printStackTrace();
        }
        return false;
    }

    // 서버로부터 로그아웃
    private boolean logout() {
        try {
            return ftpClient.logout();
        }
        catch (IOException ioe) {
            ioe.printStackTrace();
        }
        return false;
    }

    // 서버로 연결
    public void connect() {
        try {
            ftpClient.connect(server, port);
            int reply;
            // 연결 시도후, 성공했는지 응답 코드 확인
            reply = ftpClient.getReplyCode();
            if(!FTPReply.isPositiveCompletion(reply)) {
                ftpClient.disconnect();
                System.err.println("서버로부터 연결을 거부당했습니다");
                System.exit(1);
            }
        }
        catch (IOException ioe) {
            if(ftpClient.isConnected()) {
                try {
                    ftpClient.disconnect();
                } catch(IOException f) {
                    //
                }
            }
            System.err.println("서버에 연결할 수 없습니다");
            System.exit(1);
        }
    }

    // FTP의 ls 명령, 모든 파일 리스트를 가져온다
    public FTPFile[] list() {
        FTPFile[] files = null;
        try {
            files = this.ftpClient.listFiles();
            return files;
        }
        catch (IOException ioe) {
            ioe.printStackTrace();
        }
        return null;
    }

    // 파일을 전송 받는다
    public File get(String source, String target) {
        OutputStream output = null;
        try {
            File local = new File(source);
            output = new FileOutputStream(local);
        }
        catch (FileNotFoundException fnfe) {
            fnfe.printStackTrace();
        }
        File file = new File(source);
        try {
            if (ftpClient.retrieveFile(source, output)) {
                return file;
            }
        }
        catch (IOException ioe) {
            ioe.printStackTrace();
        }
        return null;
    }

    // 서버 디렉토리 이동
    public void cd(String path) {
        try {
            ftpClient.changeWorkingDirectory(path);
        }
        catch (IOException ioe) {
            ioe.printStackTrace();
        }
    }

    // 서버로부터 연결을 닫는다
    private void disconnect() {
        try {
            ftpClient.disconnect();
        }
        catch (IOException ioe) {
            ioe.printStackTrace();
        }
    }

}
참고문헌


반응형
basicplayer 를 사용하려고 테스트하던 중에 다음과 같은 에러가 났다.

java.lang.NoClassDefFoundError: org/apache/commons/logging/LogFactory

commons-logging.jar 라이브러리를 추가해주면 된다.

http://commons.apache.org/downloads/download_logging.cgi

다운받아서 추가해주자..
반응형
About the Browser

This section explains the architecture of Microsoft Internet Explorer 4.0 and later and provides information you will find helpful when reusing these components.

This topic contains the following sections.

Architectural Overview

Windows Internet Explorer uses Microsoft ActiveX Controls and Active Document interfaces to connect components. The following diagram provides a high-level overview.

Internet Explorer 4.0 Architecture.

IExplore.exe is at the top level; it is a small application that is instantiated when Internet Explorer is loaded. This executable application uses Internet Explorer components to perform the navigation, history maintenance, favorites maintenance, HTML parsing and rendering, and so on, while it supplies the toolbar and frame for the stand-alone browser. IExplorer.exe directly hosts the Shdocvw.dll component.

Shdocvw.dll in turn hosts the Mshtml.dll component, as well as any other Active Document component (such as a Microsoft Office application) that can be loaded in place in the browser when the user navigates to a specific document type. Shdocvw.dll supplies the functionality associated with navigation, in-place linking, favorites and history management, and PICS support. This DLL also exposes interfaces to its host to allow it to be hosted separately as an ActiveX control. The Shdocvw.dll component is more frequently referred to as the WebBrowser Control. In-place linking refers to the ability to click a link in the HTML of the loaded document and to load a new HTML document in the same instance of the WebBrowser Control. If only Mshtml.dll is being hosted, a click on the link results in a new instance of the browser.

Mshtml.dll is the component that performs the HTML parsing and rendering in Internet Explorer 4.0 and later, and it also exposes the HTML document through the Dynamic HTML Object Model. This component hosts the scripting engines, Microsoft virtual machine, ActiveX Controls, plug-ins, and other objects that might be referenced in the loaded HTML document. Mshtml.dll implements the Active Document server interfaces, which allows it to be hosted using standard Component Object Model (COM) interfaces.

As this is an OLE-based architecture, the ambient properties that are commonly used by ActiveX Controls can also be applied to the Internet Explorer components. In this way, a host of the WebBrowser Control can set an ambient property that will filter down to all the frames and controls hosted in the loaded document.

Choosing the Correct Component

The WebBrowser Control provides a rich set of functionality that a host typically requires, such as that for in-place linking. Therefore, it is much more applicable for most applications to host this control instead of MSHTML for browsing or viewing HTML documents. Hosting MSHTML is recommended only for specialized applications, such as parsing HTML. The WalkAll Sample Source Page demonstrates how to host MSHTML.

It should also be noted that although hosting MSHTML is slightly more lightweight than hosting the WebBrowser Control, the savings rarely justify the extra work involved in implementing functionality that is already available in the WebBrowser Control. It is very likely that the WebBrowser Control will already be loaded in memory, and navigating to a frameset page will also result in the WebBrowser Control being loaded as part of the standard working set.

Providing Extra Control

Hosts of the WebBrowser Control and MSHTML components have control over certain functionality. In the case of the WebBrowser Control, this includes navigation, as well as receiving events when the document is loaded. Hosts of either component can obtain extra control over functionality by implementing the IDocHostUIHandler and IDocHostShowUI interfaces. These interfaces are commonly used to override the context menus that are supplied by default for the browser. Their uses also include setting the 3-D border, overriding the location in the registry where options are stored, and extending the Dynamic HTML Object Model.

The component obtains these interfaces from the host by calling QueryInterface on the IOleClientSite interface implemented by the hosting application.

Controlling the Context Menus

A common requirement of hosting the WebBrowser Control is the ability to override or add to the context menus that are displayed as the result of a right-click in the browser window. This is of particular interest to applications that are using the WebBrowser Control to view rich content but do not want the user to know that HTML is being viewed. This is also advantageous for applications that do not want the user to be able to view the HTML source for the content.

There are two techniques available to achieve this. The first involves the use of the IDocHostUIHandler interface and allows an application to disable or replace the context menus. The second technique involves the use of the registry and allows the existing context menus to be extended.

Overriding the Context Menus

The WebBrowser Control's context menus can be overridden entirely by implementing the IDocHostUIHandler::ShowContextMenu method. Returning E_NOTIMPL or S_FALSE from this method indicates to the WebBrowser Control that it should display its own standard context menu. However, returning S_OK causes the WebBrowser Control not to display its menus, and it assumes that the host has performed the appropriate action. The host can disable all context menus or bring up its own context menus. The parameters supplied to the host that implements this method allow that host to identify which of the default menus will be displayed by the WebBrowser Control, as well as the coordinates where the menu will be displayed. This provides the host the full context for the menu. For example, the host can choose to override only the image context menus and not the standard context menus.

Adding to the Standard Context Menus

Items can be added to the existing context menus of the WebBrowser Control by placing entries in the registry and linking these to URLs that execute script. To add items to the standard WebBrowser Control context menus, create or open the following key:

  • HKEY_CURRENT_USER
    • Software
      • Microsoft
        • Internet Explorer
          • MenuExt

Under this key, you create a key whose name contains the text you want displayed in the menu. The default value for this key contains the URL that will be executed. The key name can include the ampersand (&) character, which will cause the character immediately following the & to be underlined. The URL will be loaded inside a hidden HTML dialog box, all the inline script will be executed, and the dialog box will be closed. The hidden HTML dialog's menuArguments property (on the external object) contains the window object of the window on which the context menu item was executed.

The following registry entry adds an item with the title "My Menu Item" to the WebBrowser Control context menu and executes the inline script contained in the file c:\myscript.htm.

  • HKEY_CURRENT_USER
    • Software
      • Microsoft
        • Internet Explorer
          • MenuExt
            • My &Menu Item

            • (Default) = file://c:\myscript.htm

The contents of c:\myscript.htm are as follows:

<SCRIPT LANGUAGE="JavaScript" defer>
   var parentwin = external.menuArguments;
   var doc = parentwin.document;
   var sel = doc.selection;
   var rng = sel.createRange();
   var str = new String(rng.text);

   if(str.length == 0)
      rng.text = "MY INSERTED TEXT";
   else
      rng.text =  str.toUpperCase();
</SCRIPT>

This script obtains the parent window object from external.menuArguments. The parent window object is the WebBrowser Control in which the context menu item was executed. The script then obtains the current selection and, if no selection is present, inserts the text "MY INSERTED TEXT" at the point where the context menu was executed. If there is a selection present, the selected text is changed to uppercase.

Optional keys

Under the item registry key created earlier, there are a couple of optional values. One of these specifies on which context menus this item will appear. The other specifies that the script should be run as a dialog box.

The "Contexts" DWORD value specifies the context menus in which an item will appear. This value is a bit mask consisting of the logical OR of the following values (defined in Mshtmhst.h). These values correspond to the constant passed in an IDocHostUIHandler::ShowContextMenu call.

Value Constant Name Description
0x01 CONTEXT_MENU_DEFAULT Shown on all context menus.
0x02 CONTEXT_MENU_IMAGE Context menu of images only.
0x04 CONTEXT_MENU_CONTROL Context menu of form controls only.
0x08 CONTEXT_MENU_TABLE Context menu of tables only.
0x10 CONTEXT_MENU_TEXTSELECT Context menu of selected text only, including images in a selected region.
0x20 CONTEXT_MENU_ANCHOR Context menu of links only. Does not include linked images or image maps.
0x40 CONTEXT_MENU_UNKNOWN Right-click on none of the above.

So if, for example, you want this simple extension to appear only in the default menu and the text selection menu, you could create a DWORD value in the registry under the My Menu Item key called "Contexts" and set it to 0x11. From C/C++ code, this can be expressed as:

CONTEXT_MENU_DEFAULT | CONTEXT_MENU_TEXTSELECT

The other optional registry DWORD value is "Flags". There is only one valid bit (0x1) for this registry value; it is defined as MENUEXT_SHOWDIALOG in Mshtmhst.h. When this bit is set, the script is run just as if it had been called through the IHTMLWindow2::showModalDialog method. The window that runs the script is not hidden, and the dialog box is not automatically closed after inline and onload script finishes. The external.menuArguments value still contains the window object where the user selected the menu item.

The context menu event

Whenever a context menu extension is triggered, the event object off the main window (external.menuArguments.event) contains information about where the user clicked and which context menu was shown. The mouse coordinates are valid along with srcElement. The type value contains one of the following strings, indicating which context menu was shown to the user:

  • MenuExtDefault
  • MenuExtImage
  • MenuExtControl
  • MenuExtTable
  • MenuExtTextSelect
  • MenuExtAnchor
  • MenuExtUnknown

Another example

This example creates a new menu item on the default context menu. This item, called Show In New Window, can be used to launch a new window that displays only a specific portion of the current document. If something is deeply nested in a frameset, you can easily launch a specific frame in its own window.

Here are the contents of a .reg file that can be run to insert the correct registry settings. Call this file Example2.reg. Double-clicking this file in Windows Explorer will insert the settings in your registry.

REGEDIT4

    [HKEY_CURRENT_USER\Software\Microsoft\Internet Explorer\MenuExt\Show in New Window]
    @="file://c:\\example2.htm"
    "Contexts"=dword:00000001

Here are the contents of c:\example2.htm:

<SCRIPT LANGUAGE="JavaScript" defer>
    window.open(external.menuArguments.location.href);
</SCRIPT>

For more information, see Adding Entries to the Standard Context Menu.

Extending the Dynamic HTML Object Model

It is possible for the hosting application to extend the Dynamic HTML Object Model so that scripts can refer to functionality implemented by the host. Such scripts refer to the host by specifying the external object that is available from the window object. For example, a reference to "window.external.speech" will call the host to resolve the name "speech." All standard script within the document will be executed normally.

This extension mechanism is implemented in the host by providing an IDispatch interface for the object model extension that will have IDispatch::GetIDsOfNames and IDispatch::Invoke called on it to resolve any references to the external object. The IDispatch that the host provides is obtained by the WebBrowser Control or MSHTML component by calling the host's IDocHostUIHandler::GetExternal method.

For an example of how to extend the Dynamic HTML Object Model, see the Driller Sample Source Page.

Download Control

Hosts can control certain aspects of downloading—frames, images, Java, and so on—by implementing both IOleClientSite and an ambient property defined as DISPID_AMBIENT_DLCONTROL. When the host's IDispatch::Invoke method is called with dispidMember set to DISPID_AMBIENT_DLCONTROL, it should place zero or a combination of the following values in pvarResult.

DLCTL_BGSOUNDS The browsing component will play background sounds associated with the document.
DLCTL_DLIMAGES The browsing component will download images from the server.
DLCTL_DOWNLOADONLY The browsing component will download the page but not display it.
DLCTL_FORCEOFFLINE The browsing component will always operate in offline mode. This causes the BINDF_OFFLINEOPERATION flag to be set even if the computer is connected to the Internet when making requests through URLMON.
DLCTL_NO_BEHAVIORS The browsing component will not execute any behaviors.
DLCTL_NO_CLIENTPULL The browsing component will not perform any client pull operations.
DLCTL_NO_DLACTIVEXCTLS The browsing component will not download any ActiveX Controls in the document.
DLCTL_NO_FRAMEDOWNLOAD The browsing component will not download frames but will download and parse the frameset page. The browsing component will also ignore the frameset, and will render no frame tags.
DLCTL_NO_JAVA The browsing component will not execute any Java applets.
DLCTL_NO_METACHARSET The browsing component will suppress HTML Character Sets reflected by meta elements in the document.
DLCTL_NO_RUNACTIVEXCTLS The browsing component will not execute any ActiveX Controls in the document.
DLCTL_NO_SCRIPTS The browsing component will not execute any scripts.
DLCTL_OFFLINE Same as DLCTL_OFFLINEIFNOTCONNECTED.
DLCTL_OFFLINEIFNOTCONNECTED The browsing component will operate in offline mode if not connected to the Internet. This causes the BINDF_GETFROMCACHE_IF_NET_FAIL flag to be set if the computer is connected to the Internet when making requests through URLMON.
DLCTL_PRAGMA_NO_CACHE The browsing component will force the request through to the server and ignore the proxy, even if the proxy indicates that the data is up to date. This causes the BINDF_PRAGMA_NO_CACHE flag to be set when making requests through URLMON.
DLCTL_RESYNCHRONIZE The browsing component will ignore what is in the cache and ask the server for updated information. The cached information will be used if the server indicates that the cached information is up to date. This causes the BINDF_RESYNCHRONIZE flag to be set when making requests through URLMON.
DLCTL_SILENT The browsing component will not display any user interface. This causes the BINDF_SILENTOPERATION flag to be set when making requests through URLMON.
DLCTL_URL_ENCODING_DISABLE_UTF8 The browsing component will disable UTF-8 encoding.
DLCTL_URL_ENCODING_ENABLE_UTF8 The browsing component will enable UTF-8 encoding.
DLCTL_VIDEOS The browsing component will play any video clips that are contained in the document.

Security Manager

Hosts of the browsing components can implement their own security management and override the settings that exist for the WebBrowser Control. This is achieved by implementing the IInternetSecurityManager interface. The browsing component will obtain this interface by calling the host's IServiceProvider::QueryService method with SID_SInternetSecurityManager. For more information on security management, see About URL Security Zones.


반응형

Java 로 사용될 수 있는 Browser Component 에 대하여 (리눅스 플렛폼에서 사용할 목적으로) 조사하였음.

실 사용자의 사용 브라우저와 가장 근접한 렌더링 결과를 내면서 가장 높은 접근성을 가지는 것을 목적으로 조사하였기 때문에.

결과가 Mozilla Compatable 한 방향으로 편중 되어 있음을 미리 염두에 두고 보시면 편할 듯.


http://www.webrenderer.com/index.php

Full Swing 으로 구현된 Mozilla Compatable Browser. 상용이다.

아무래도 돈주고 사는 제품이다 보니, 완성도는 높을 듯. 랜더링,접근성 대비 최상이라고 예상됨.


http://www.icesoft.com/products/icebrowser.html

Full Java로 구현되었으며 Java Application에 Embed 되어 사용되는 목적으로 개발 되었다.

상용제품으로 완성도는 높지만, 가격이 문제. Mozilla Compatable 하지 않으므로 효용성이 떨어짐


http://jazilla.sourceforge.net/

Java로 구현된 Mozilla compatible(HTML,XUL) rendering engine

현재 M4 까지 진행 된 상태 이며, 오픈소스로 진행 되며, M4까지 진행 된 관계로 완성도가 떨어질 것으로 예상.

정확한 완성도는 살펴보지 못 하였음. 관련 자료는 http://sourceforge.net/projects/jazilla/ 에서 다운로드 받을 수 있음.


http://mozillaparser.sourceforge.net/

Mozilla Parser만 연결한 방식, Rendering 이 들어가 있지 않으므로 반쪽 효용성.

JNI 방식이며 설명에도 나와 있지만 연결방식이 매끄럽지 못하여 성능 문제가 있는것 으로 보임.


http://www.eclipse.org/atf/

가장 Stable 하다는 평이 있음. SWT 용 이며, Browser 목적으로 따로 나와 있는 것이 아니고,

ATF에서 사용되는 일부 기능인 만큼, 분석 및 따로 떼어서 작성하는 과정이 필요함. (Firefox,IE 등 모두 연결 가능)


http://www.mozilla.org/projects/blackwood/webclient/

Java WebShell 을 사용하는 개념을 지원하는 Mozilla 프로젝트 (Gecko 뿥만 아니라 Windows에서 IE도 연결 가능하다고 함)

Mozilla 정식 프로젝트 인 만큼 가장 많은 기능을 사용할 수 있으며, 랜더링 또한 Firefox와 같은 수준

접근성 또한 높은 수준으로 제공됨, 다만 Full Java 가 아니기 때문에 완벽한 접근성이 보장되는 것은 아님.


https://jdic.dev.java.net/

java.net 에서 호스트 되는 프로젝트로 Mozilla 뿐만 아니라 IE등의 브라우져를 JNI 방식으로 연결하여 제공한다.

기능성 및 접근성이 많이 떨어진다.


http://jrex.mozdev.org/

Mozilla Gecko를 Embedding 하여 사용할 수 있도록 지원한다. JNI 방식이며 GRE를 설치하여 사용한다.

Mozilla Gecko 1.4  이상 과 호환되며 접근성은 어느정도 제한적 인 것으로 보인다.

반응형
V. 메일 수신 예제
=================

 이 장에서는 JavaMail API를 이용한 메시지 수신 예제인 MailReciever.java에 대하여 다루겠다.
MailReciever는 간단하게 POP3를 이용하여 수신함에서 메일 메시지를 가져다가 local disk에
저장하는 프로그램이다.  전체 코드는 MailReciever.java 화일로 첨부해놓았으며, 여기서는
주로 전체적인 기능 및 부분 코드로 설명하겠다.

  MailReciever를 실행 시키려면 우선 다음과 같이 메일 호스트, 사용자 아이디, 암호 그리고
메일을 저장할 디렉토리이름을 main 메소드 에서 변경하여 바꾼 후에 컴파일 하여 실행 시키면 된다.

MailReciever reciever = new MailReciever();
reciever.setHost("www.xxxx.yyyy");
reciever.setUser("aaaa");
reciever.setPassword("bbbb");
reciever.setHomeDir("c:/mail");
        
reciever.recieve();


1. constructor
-----------------------------------------

  MailReciever의 Constructor에서는 우선 다음과 같이 메일 처리를 위한 Session 객체를 
생성하고 있다. Session 객체는 member variable인 session에 대입하여 놓는다.

Properties props = System.getProperties();
session = Session.getDefaultInstance(props, null);


2. recieve()
-----------------------------------------
  실제 메일을 수신하는 메소드는 recieve() 메소드 이다.  recieve() 메소드는 session으로 부터
pop3 Store 객체를 생하고 INBOX folder를 생성하여 message를 수신한다.

......

// Get folder
Folder folder = store.getFolder("INBOX");
    
// Open read-write
folder.open(Folder.READ_WRITE);
    
// Get message
Message message[] = folder.getMessages();
......

메일을 목록을 저장할 index화일과 메시지들을 저장할 디렉토리를 생성한 후에 
각각의 메시지들을 processMessage() 메소드를 호출하여 처리한다.

// index open
File indexFile = File.createTempFile("list", ".idx", new File(getHomeDir()));
FileOutputStream fout = new FileOutputStream(indexFile.getPath(), true);
indexWriter = new BufferedWriter(new OutputStreamWriter(fout));
        
// make folder
mailFolderName = getHomeDir() + "/" + indexFile.getName() + ".dir";
File mailFolder = new File(mailFolderName);
mailFolder.mkdir();
        
// process message
for(int i=0; i < message.length; i++) {
    processMessage(message[i]);
}

.......


3. processMessage()
---------------------------------------
  processMessage() 메소드는 각각의 메시지에 대한 발신자, 제목, 발신일, 저장할 폴더 등
목록에 해당하는 내용을 만든다.

.............

 // from
 sarr = message.getHeader("From");
 if(sarr == null || sarr.length == 0) {
   from = "";
 }
 else {
  from = decodeString(sarr[0]);
 }
            
 // subject
 sarr = message.getHeader("Subject");
 if(sarr == null || sarr.length == 0) {
   subject = "";
 }
 else {
   subject = decodeString(sarr[0]);
  }
            
// send date
sendDate = message.getSentDate();

.................


  메시지의 내용을 저장할 message+msgIndex 디렉토리를 만든다.  메시지의 내용과 
첨부 화일을 저장해야 함으로 내용을 저장할 $content.message 화일은 미리 open해 놓는다.
message는 여러부분의 Part로 구성될 수 있으므로 processPart 메소드를 호출하여 처리한다.
메시지를 처리한 후에 index 부분을 write한다.

        
// open content writer
FileOutputStream fout = new FileOutputStream(msgFolderName + "/" + "$content.message");
contentWriter = new BufferedWriter(new OutputStreamWriter(fout));
        
//process part
System.out.println(message.getSubject());
processPart(message);        
        
// header white
indexWriter.write(from + "\t");
indexWriter.write(subject + "\t");
indexWriter.write(sendDate +"\t");
indexWriter.write(msgFolderName + "\t");
indexWriter.write(appendCount + "\n");

// close content writer
contentWriter.close();


4. processPart()
--------------------------------------
  processPart()는 우선 Part의 내용을 화일로 저장할지 아니면 메시지 내용으로 write할 지를
결정한다.

String fileName = part.getFileName();
String disposition = part.getDisposition();
boolean isAttachement = false;
        
if (fileName != null || disposition != null) {
  isAttachement = true;
}

......

  mime type에 따라 Part의 내용을 처리하되 "text/*" 일 경우는 내용 저장, "multipart/*" 일 경우는
이를 다시 Part로 나누어 재귀적으로 processPart() 메소드를 호출, 그리고 "message/rfc822" 일 경우는
다시 processPart()를 다시 호출 한다.  나머지 경우는 내용을 저장한다.


if (part.isMimeType("text/*")) {
    
  if(isAttachement) {
    saveFile(fileName, part.getContent());
    appendCount++;
  }
  else {
    saveContent(part.getContent());
  }
                            
} else if (part.isMimeType("multipart/*")) {
            
  Multipart mp = (Multipart)part.getContent();        
  for (int i = 0; i < mp.getCount(); i++) {
    processPart(mp.getBodyPart(i));
  }
    
} else if (part.isMimeType("message/rfc822")) {
            
  processPart((Part)part.getContent());
            
} else {
            
  Object obj = part.getContent();
        
  if(isAttachement) {
    saveFile(fileName, obj);
    appendCount++;                
  }
  else {
    saveContent(obj);
  }

}


5. saveFile()
--------------------------------------
  화일이름과 내용을 담은 Object를 주면 중복되지않게 화일 이름에 일련번호를 붙여
내용을 저장한다.  내용 Object 가 InputStream일 경우는 stream을 읽어 내용을 저장하고
아닐 경우는 String으로 만들어 저장한다.


6. saveContent()
--------------------------------------
  내용을 담은 Object를 받아들여 이미 열려있는 contentWriter에 내용을 write한다.
내용 Object 가 InputStream일 경우는 stream을 읽어 내용을 저장하고
아닐 경우는 String으로 만들어 저장한다.


7. 기타 methods
--------------------------------------
  toHangle 메소드는 문자열을 한글체계로 바꾸는 메소드이고, decodeString은
메일 메시지의 헤데 문자열이 encoding되어 있을 때 MimeUtility를 이용하여
decode 하는 메소드이다.  searchPattern은 encoding되어 있는 문자열을 구분해내는
역할을 한다. 
반응형
IV. 메일 메시지 수신
======================

  메일 메시지의 수신은 우선 POP3나 IMAP은 지원하는 메일 서버가 있다는 전제로
될 수 있다.  그리고 메일서버에 메일을 수신할 수 있는 계정이 만들어져있고
수신함 즉 "INBOX"가 존재하여 타인이 메일 서버로 메시지를 보낼 때 이 수신함에
그 메시지가 저장이 되어야 한다. 

  이러한 환경이 설정되어 있어야 JavaMail API를 이용하여 메일 서버의 수신함에
저장된 메시지를 가져올 수 있다.  메일 서버와 통신을 하여 수신함에서 수신된 
메시지를 꺼내올 수 있는 실제 클레스들은 기본적으로 com.sun.mail.imap 과 
com.sun.mail.pop3 패키지로 제공되는데 만일 다른 제공자의 클레스를 사용하고자 
한다면 Session의 프로퍼티를 설정해야 한다.

  다음은 POP3 프로토콜을 이용하여 수신함에서 메시지를 가져와 발신자와
제목을 화면에 보여주는 예제이다.


String server = "www.xxx.zzz";
String user   = "aaaa";
String pass   = "bbbb";

// 프로퍼티 
Properties props = new Properties();

// 세션 객체 생성 
Session session = Session.getDefaultInstance(props, null);

// POP3 Store 연결
Store store = session.getStore("pop3");
store.connect(server, user, pass);

// INBOX Folder 가져옮
Folder folder = store.getFolder("INBOX");
folder.open(Folder.READ_ONLY);

// 수신된 메시지들을 Folder에서 가져옮
Message message[] = folder.getMessages();

for (int i=0, n=message.length; i<n; i++) {
   System.out.println(i + ": " + message[i].getFrom()[0] 
     + "\t" + message[i].getSubject());
}

// 연결을 끊는다.
folder.close(false);
store.close();
  
  위의 예에서 보듯이 POP3를 지원하는 메일 서버 주소, 아이디, 패스워드만 있으면
Stroe 객체를 통하여 서버와 연결하여 Folder객에체서 Message 객체들을 얻어와 메일을 수신할 
수 있다.  Message 객체는 메일을 구성하는 수신자, 발신자, 제목, 내용등이 모두들어
있다.

  Message객체에서 getFrom 메소드를 호출하면 발신자 경로를 추적할 수 있는 Address
Array를 받을 수 있다.  최종 발신자는 0 번째에 있다.  메일 메시지의 제목을 얻으려면
Message의 getSubject 메소드를 호출하면 된다.  이러한 수신자, 발신자 또는 제목 등은
메일은 헤더에 해당하는데, 이는 getHeader 메소드를 통하면 원본 String을 얻을 수 있다.

  String from = message.getHeader("From");
  String subject = message.getHeader("Subject");

위의 예제에서 원본 String은 MIME 규칙에 의해 Encoding되어 있는 경우가 있는데 이럴때는
java.mail.internet.MimeUtility의 decodeWord 메소드를 이용하여 원본을 복구해내야 한다.

  메시지의 내용을 받는 방법은 기본적으로 Message 클레스의 getContent 메소드를 이용하도록
되어 있다.  getContent 메소드는 Part 인터페이드에 정의 되어 있다.  하지만 메시지의
내용이 어떤형태로 구성되어 있는냐를 고려해야 한다.  

  메시지 내용의 MIME type이 "text/plain" 또는 "text/html"일 경우는 비교적 간단하게
처리할 수 있다.  getContent로 얻은 객체를 toString 메소드를 이용하여 문자열로 받을 수도
있고 또다를 방법은 getText 메소드를 이용하여 내용을 문자열로 받을 수 있다.  
내용이 어떠한 MIME TYPE을 하고 있는지는 isMimeType 메소드로 비교할 수 있다. 다음은
text로 구성된 메시지의 내용을 받은 예제이다.

  Message[] message = folder.getMessages();

  for(int i=0; i < message.length; i++) {

    if(message[i].isMimetype("text/*")) {
      String content = message[i].getContent().toString();
      System.out.println(content);
    }
    else if(message[i].isMimeType("multipart/*)) {
      ...
    }
    else {
      ...
    }

  }

 메시지의 내용이 첨부화일을 갖는 경우는 보통 MIME type이 "multipart" 로 되어 있다.
이러한 경우는 Message 객체 의 content를  Multipart 객체로 casting해야 처리할 수 있다.
Multipart는 여러가지 Part가 모여있는 형태임으로 각각의 BodyPart를 추출하여 기본 내용 
텍스트로 쓸 것인지 첨부화일로 쓸 것인지를 판단한다.

Part의 내용을 처리하는 기준은 getDisposition 함수를 이용하여 얻을 수 있는데 비교할 수 있는
Constants는 Part에 있는 Part.ATTACHMENT 와 Part.INLINE이다.  Part.ATTACHMENT는 첨부
화일이라는 의미이고 Part.INLINE은 내용을 화면에 표시한다는 의미이다. 다음은 본문은
화면에 표시하고 첨부는 화일에 저장하는 예제이다.

// 메시지가 multipart인 경우
if(message.isMimeType("multipart/*")) {

  // 내용을 Multipart로 만듬
  Multipart mp = (Multipart)message.getContent();

  // 각각의 part를 순서데로 처리
  for (int i=0, n=multipart.getCount(); i<n; i++) {

    // 처리될 body part
    Part part = multipart.getBodyPart(i));

    // 처리 기준을 가져옴
    String disposition = part.getDisposition();
    String filename    = part.getFileName();
    
    // disposition이 Attachment이거나 file name이 있으면 저장
    if((disposition != null && disposition.equals(Part.ATTACHMENT)) ||
       (filename != null)) {
      saveFile(filename, part.getInputStream());
    }
    // 본문 처리
    else {
      .......
    }

  }
}

else {
  ....
}

위의 예제는 Message의 MIME type이 "multipart/*" 일 때 처리하는 로직이며
saveFile 메소드는 이미 있다고 가정한다.  그리고 본문처리 로직은
적절히 화면이 보여주거나 다른 곳이 저장한다고 가정한다.

POP3 프로토콜을 수신함에 있는 메시지를 삭제하는 기능도 정의하고 있다.
따라서 다음과 같이 수신함에 있는 메시지를 받아온 다음 수신함에서 해당 메시지를 
삭제할 수도 있다.

메시지 삭제는 다음과 같은 메시지 상태 flag를 바꾸어줌으로서 가능한데 각가의 flag는
Flags 클레스에 정의되어 있다.

- Flags.Flag.ANSWERED 
- Flags.Flag.DELETED 
- Flags.Flag.DRAFT 
- Flags.Flag.FLAGGED 
- Flags.Flag.RECENT 
- Flags.Flag.SEEN 
- Flags.Flag.USER 

위의 flag들은 모든 메일 서버가 지원하는 것은 아니다.  각각의 메일 서버마다 지원하는
flag가 있고 지원하지 않는 flag가 있다.  그리고 POP3 프로토콜에서는 DELETED flag만을
지원하도록 되어 있다. 어떠한 flag들이 지원되는지 알려면 Folder 객체의 getPermanentFlags()
메소드를 이용하면 된다.

메시지의 삭제 방법은 우선 Folder 객체를 READ/WRITE 형으로 연 다음  Message 객체의 flag을 
DELETED 상태로 바꾼다.

folder.open(Folder.READ_WRITE);
.......
message.setFlag(Flags.Flag.DELETED, true);

실제 메시지가 삭제되는 시점은 folder를 close하는 시점인데 다음과 같이 파라미터에 true를
준다.

folder.close(true);

메시지를 수신하는 전반적인 방법은 다음 장에 Reciever.java 예제로 다시한번 설명하겠다. 
반응형
III. 메일 메시지 발신
======================

  메일 메시지를 보내려면 우선 보낼 서버, 수신자, 발신자, 제목, 내용 등이 필요한다.
우선 서버의 지정은 Session을 생성할 때 넘겨주는 Properties에 "mail.smtp.host" 라는
키로 서버 주소를 지정함으로서 SMTP 전송을 처리하는 메일 서버를 지정한다.

  수신자, 발신자, 제목, 내용 등을 지정하려면 우선 이들을 하나의 메시지에 묶는
Message 객체가 필요한데, Message는 추상 클레스이므로 javax.mail.internet 패키지에
있는 MimeMessage를 이용한다.

  발신자는 Message 객체의 setFrom 메소드로 지정하되 InternetAddress 객체를 생성하여
지정한다.  수신자는 Message 객체의 addRecipient 메소드로 지정하되 Message.RecipientType
을 참고하여 지정한다.

  최종적 전송은 Transport 클레스의 static 메소드인 send로 한다.  다음은 일반 텍스트를 
SMTP를 이용하여 간단히 전송하는 예제이다.


String host = "xxx.zzz.com";
String from = "hong@xxx.zzz";
String to = "chun@aaa.bbb";

// 서버 프로퍼티 설정 
Properties props = System.getProperties();
props.put("mail.smtp.host", host);

// Session 객체 생성
Session session = Session.getDefaultInstance(props, null);

// 메시지 생성
MimeMessage message = new MimeMessage(session);
InternetAddress addr = new InternetAddress(from, "홍길동", "euc-kr");

message.setFrom(addr);
message.addRecipient(Message.RecipientType.TO, new InternetAddress(to));
message.setSubject("Test Mail");
message.setText("This is a Test Mail");

// 메시지 전송 
Transport.send(message);


  메일 내용을 HTML로 보내려면 Message 객체의 setContent 메소드를 사용하면 된다. setContent
메소드는 Part인터페이스에 정의되어 있는데 Message 클레스는 이를 Implement하도록 되어 있다.
다음은 message 객체에 "text/html" 형식으로 내용을 주는 예제이다.


String content = "<FONT COLOR=BLUE SIZE=20> 안녕하십니까 ? " +
                 "<A HREF=WWW.JAVANURI.COM> 자바누리입니다. </A> </FONT>";
message.setContent(content, "text/html; charset=\"euc-kr\"");


  첨부 화일을 보내는 경우는 Message의 내용을 MultiPart 객체로 설정해야 한다.  MultiPart 클레스는
메시지 내용을 여러가지 부분(BodyPart)으로 구성할 수 있게 해준다.  각각의 내용부분의 BodyPart와
화일부분의 BodyPart를 생성한 후에 이들을 MultiPart에 추가하여 하나의 메시지가되도록 병합한다.
이 MultiPart를 Message의 content로 설정한 후 전송하면 여러개의 첨부화일을 간단히 처리할 수 있다.

  JavaMail API에서 화일을 처리할 경우 FileDataSource, DataHandler 등의 JAF 패키지 클레스들을
사용하게되는데 이는 JAF(JAVABEANS ACTIVATION FRAMEWORK)의 표준 자료 처리방식을 지원하는 클레스들
이다. 

  다음은 MultiPart 및 BodyPart를 구현하는 구체적 클레스 MimeMultiPart, MimeBodyPart를 이용하여
첨부 화일을 전송하는 예제이다.

SendAttachement.java
==============================================================================================
import java.io.*;
import java.util.Properties;
import javax.mail.*;
import javax.mail.internet.*;
import javax.activation.*;

public class SendAttachement {

  //-------------------------------------------
  // main
  //-------------------------------------------
  public static void main (String args[]) throws Exception {

    // 메일서버, 수신자, 발신자, 화일이름
    String host = "www.xxx.com";
    String from = "aaa@javanuri.com";
    String to = "zzz@javanuri.com";      
    String fileName = "mydoc.txt";
      
    // 프로퍼티 설정
    Properties props = new Properties();
    props.put("mail.smtp.host", host); 
  
    // Session 생성
    Session session = Session.getDefaultInstance(props, null);

    // MimeMessage 메시지 생성
    MimeMessage message = new MimeMessage(session);
    InternetAddress addr = new InternetAddress(from, "홍길동", "euc-kr");        
    message.setFrom(addr);
    message.setSubject("첨부 테스트 메일");        
    message.addRecipient(Message.RecipientType.TO, new InternetAddress(to));

    // Multi Part 생성
    Multipart multipart = new MimeMultipart();        
        
    // 메시지 BodyPart 생성 및 Mutil Part에 추가 
    BodyPart messageBodyPart = new MimeBodyPart();
    messageBodyPart.setText("테스트 첨부화일 입니다.");    
    multipart.addBodyPart(messageBodyPart);

    // 첨부 화일 BodyPart 생성 및 Multi Part에 추가 
    BodyPart fileBodyPart = new MimeBodyPart();
    DataSource source = new FileDataSource(fileName);
    fileBodyPart.setDataHandler(new DataHandler(source));
    fileBodyPart.setFileName(fileName);
    multipart.addBodyPart(fileBodyPart);
        
    // Multi Part 메시지에 content로 설정
    message.setContent(multipart);

    // 메일 메시지 전송
    Transport.send(message);
    

  }
   
}

+ Recent posts